

The overhead squat assessment, often shortened to OHSA or OSA, survives in performance departments for a practical reason. It needs almost no equipment, takes about two minutes per athlete, and loads the whole movement chain in one pattern. Ankles, knees, hips, trunk and shoulders all have to cooperate, so a restriction in one place tends to show up as a compensation somewhere else.
Performing it is the easy part. Reading it the same way twice, across different staff members and ten weeks apart, is where most screening programmes lose their value. This guide covers setup, the protocol, every common compensation and what it points to, how to score and document it, and where visual scoring stops being enough.
What the Overhead Squat Assessment Actually Measures
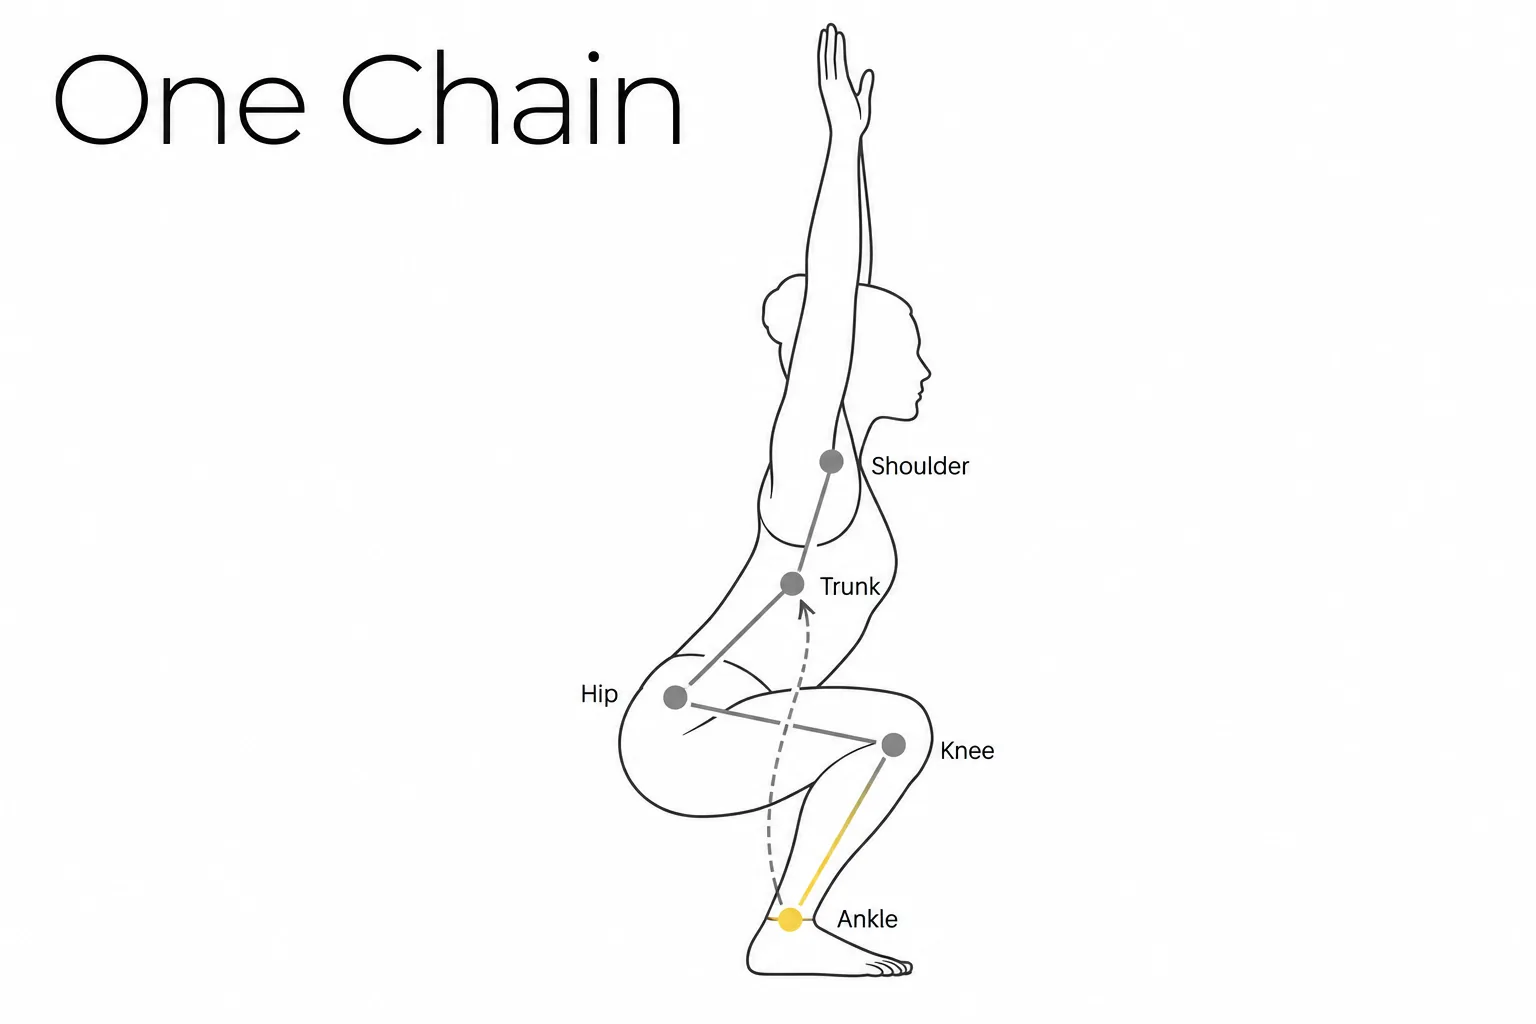
It is a transitional movement assessment: the athlete changes position without changing base of support. That places it between static posture screens, where the athlete stands still, and dynamic screens built around gait, landing or cutting. Certification curricula group it the same way, including the NASM overhead squat assessment most coaches trained on.
In one pattern, you are looking at:
- Ankle range, particularly dorsiflexion
- Knee control side to side
- Hip mobility and hip-pelvis-low back stability
- Trunk control while the arms are held overhead
- Upper back extension and shoulder range
The reason it earns its two minutes is the chain effect. An athlete with limited ankle range does not simply stop squatting. They find a route around the restriction: the foot rotates out, the arch drops, the torso pitches forward, or the arms drift. The compensation you see is rarely where the problem lives.
Be equally clear about what it is not. It is not a diagnosis. It is not a strength test. It does not replace coaching judgement or a medical examination. It tells you where to look next, and gives a coach, an athletic trainer and a sport scientist a shared starting point for the same conversation.
Setup: Space, Equipment and Athlete Position
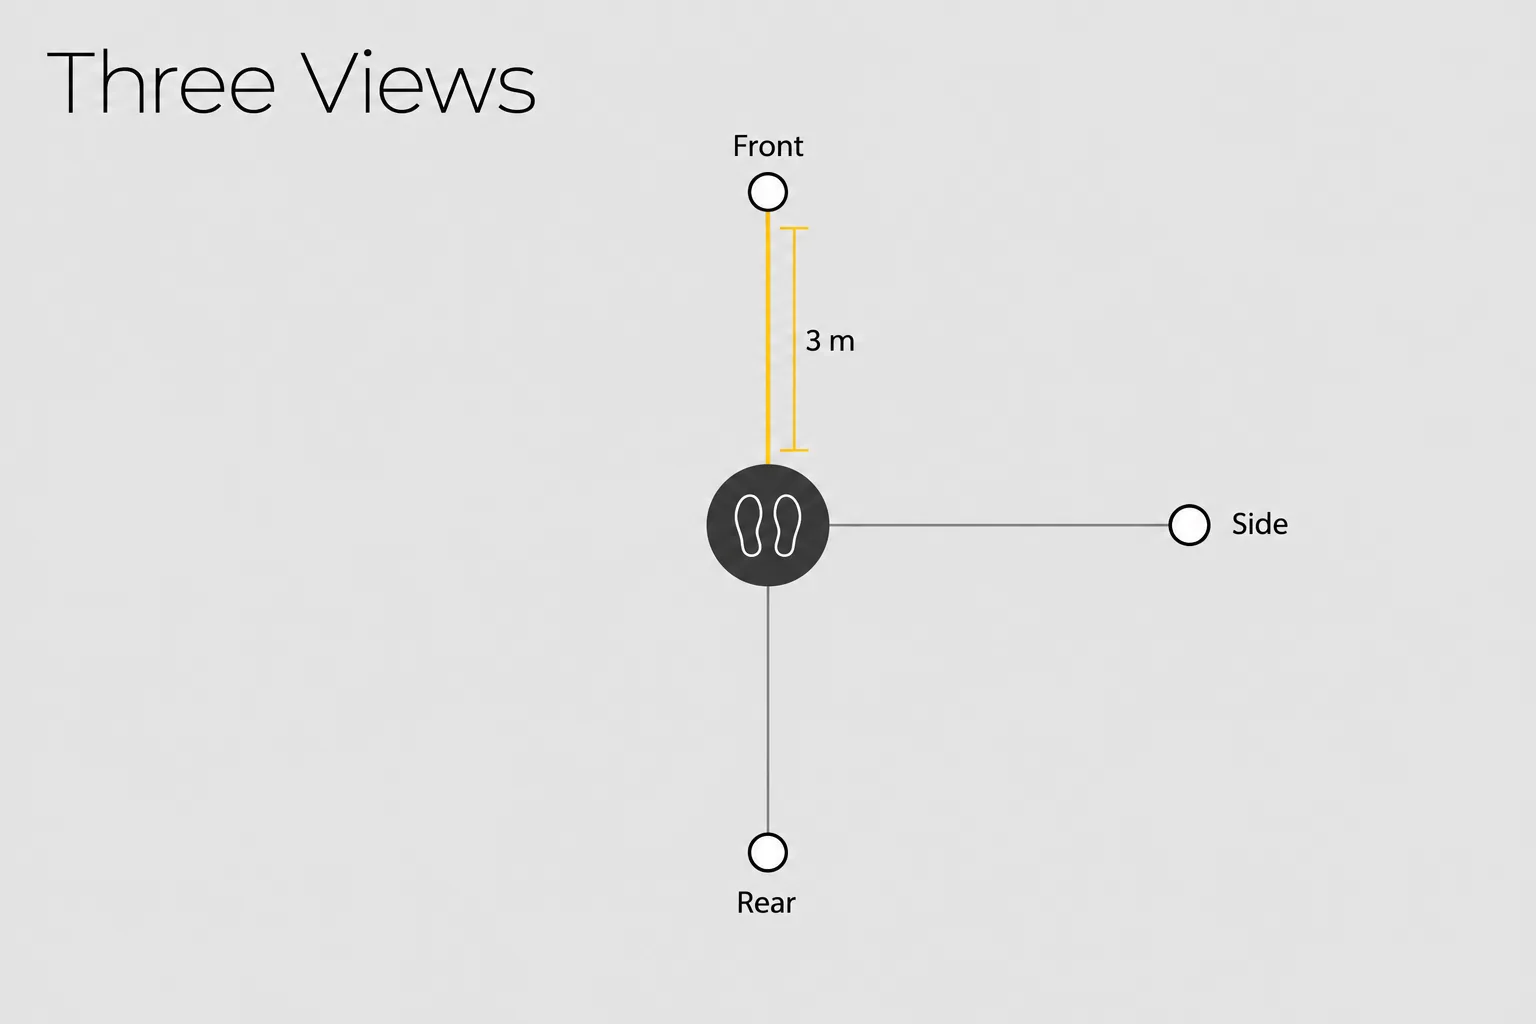
Space and environment
- Flat, non-slip floor with room to observe from the front, the side and behind
- Even lighting, with the athlete clear of visual clutter if you are filming
- The same location every time, so lighting and floor surface never become the variable
Equipment
- Optional dowel or PVC pipe for a consistent arm position
- A small board or weight plates for the heel-raised retest
- A tablet or camera on a tripod in a fixed position if you record the screen
Athlete position
- Shoes off where practical, so you can see the arches and heel behaviour
- Feet roughly shoulder width, toes pointed straight ahead, weight through the midfoot
- Arms raised overhead, elbows straight, upper arms level with or just beside the ears
- If using a dowel, hands roughly shoulder width apart
- Clothing that lets you see knees, hips and low back
Give the instruction once, in plain language: squat to about the height of a chair seat, then stand back up. Resist the urge to coach the pattern into a better one. Cueing the knees out or the chest up produces a corrected squat, not the athlete’s habitual squat, and the habitual pattern is what you are trying to record. Note the starting position before movement begins, including any obvious standing asymmetry.
How to Perform the Overhead Squat Assessment Step by Step
- Set the athlete in the stance and arm position described above and confirm they are comfortable holding it.
- Stand about three metres in front of them, at hip height where possible, so you are not looking down at the joints.
- Ask for five controlled repetitions to roughly chair-seat depth, at an even tempo, without pausing at the bottom.
- Observe the front-view checkpoints during those five reps.
- Move to the side, repeat five reps, observe the side-view checkpoints.
- Move behind the athlete, repeat five reps, observe the rear-view checkpoints.
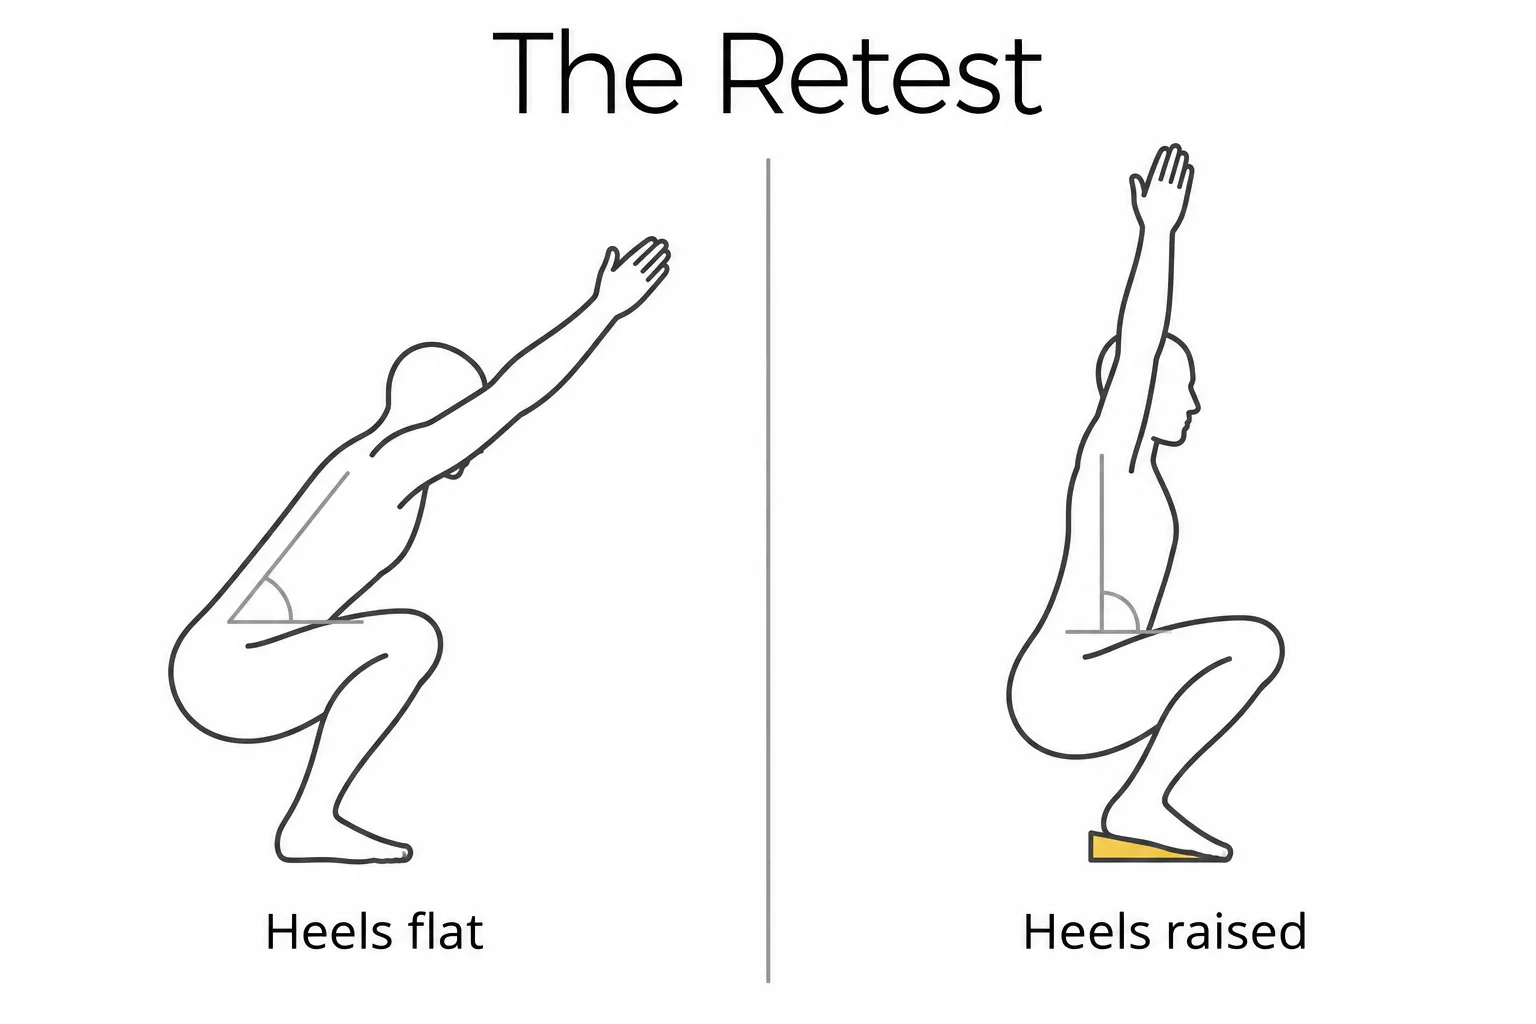
- If you saw compensations from the front or the side, repeat one set with the heels raised.
- Record findings immediately, before the next athlete steps in.
Score what repeats. A single knee that dips inward on rep two and never again is noise. A knee that dips on four reps out of five is a finding. This is the easiest way to make a screen more consistent, and it costs nothing.
Front View: Feet, Ankles and Knees
| View | Checkpoints | Primary Signal |
|---|---|---|
| Front | Feet, ankles, knees | Foot turnout, arch collapse, heel rise, knee valgus |
| Side | Hips, low back, shoulders, arms | Forward lean, low back arching or rounding, arms drifting forward |
| Rear | Heels, arches, hips | Heel rise, arch collapse, lateral hip shift |
Watch for:
- Feet turning outward from their starting angle
- Arches flattening or the foot rolling inward
- Heels lifting off the floor at depth
- Knees travelling inward (valgus) or bowing outward
Record whether the deviation is on both sides or one side only. A symmetrical pattern is usually a mobility or motor control conversation. A one-sided pattern changes the programming response, and it is the finding most worth flagging to the medical staff.
Side View: Hips, Torso and Arms
Checkpoints: hips and low back, shoulders, arms.
Watch for:
- Excessive forward lean of the torso
- Low back arching as the athlete descends
- Low back rounding near the bottom of the squat
- Arms drifting forward, out of line with the ears
A quick reference: compare the angle of the torso to the angle of the shin. In a well-organised squat they stay roughly parallel. When the torso pitches noticeably steeper than the shin, you have a forward lean finding rather than a normal hip-dominant pattern.
Rear View and the Heels-Raised Modification
From behind, look for heel rise, arch collapse, and any shift of the hips toward one side during the descent or the drive back up. A weight shift is easy to miss from the front and often shows up here first.
Then retest with the heels raised on a board or two small plates. This is the most useful five seconds in the whole screen. If the forward lean, the knee valgus or the heel rise clears once the heels are raised, ankle range is a likely contributor and your follow-up work starts there. If the compensation persists, look further up the chain at the hips, trunk or upper back.
For athletes who cannot get their arms overhead at all, whether through shoulder restriction, a current complaint or simply being early in a rehab progression, the screen loses its meaning. Plan for it rather than pushing through it: use a bodyweight squat, a box squat or a sit-to-stand instead, and record the modification alongside the result so nobody compares two different tests six months later.
How Deep Should the Squat Go?
The common reference is roughly the height of a chair seat, with the thighs approaching parallel to the floor. That depth is deep enough to expose most restrictions and shallow enough that the majority of athletes can control it.
Going deeper than an athlete can control does not give you more information. It gives you compensations that reflect your depth instruction rather than a real restriction. Every athlete will eventually round the low back or lift the heels if pushed far enough.
Depth consistency matters more than the specific depth you pick. If one staff member cues chair height and another cues as deep as you can go, the two sets of results cannot be compared, and neither can the same athlete’s results across a season. Pick a depth cue, write it into the protocol, and use the same words every time.
Reading the Compensations: What Each Deviation Suggests
A compensation is the body finding a path around a restriction. That makes each deviation a signpost toward tissue that is likely working too hard and tissue that is likely not contributing enough. Treat the chart below as a set of hypotheses to test with follow-up assessment, not as conclusions to act on directly.
| Compensation | Commonly overactive | Commonly underactive | Follow-up |
|---|---|---|---|
| Feet turn out or arches flatten | Soleus, gastrocnemius, peroneals, lateral hamstrings | Medial hamstrings, gluteus medius, deep hip rotators, tibialis posterior | Ankle range test, heels-raised retest, single-leg comparison |
| Knees move inward | Adductors, tensor fasciae latae, lateral hamstrings, calves | Gluteus maximus and medius, medial hamstrings, tibialis posterior | Single-leg squat, step-down |
| Excessive forward lean | Soleus, gastrocnemius, hip flexors, abdominal complex | Gluteus maximus, spinal erectors, anterior tibialis | Heels-raised retest, hip flexor length screen |
| Low back arches | Hip flexors, erector spinae, latissimus dorsi | Gluteus maximus, deep core, hamstrings | Hip extension screen, trunk control test |
| Arms fall forward | Latissimus dorsi, pectorals, teres major | Mid and lower trapezius, rhomboids, rotator cuff, deep neck flexors | Shoulder and upper back extension screen |
This framework draws on commonly cited movement-screening research from the mid-2000s (Ireland, Bell, Padua, and colleagues), but it’s worth being direct about the state of that evidence. A systematic review of the broader hip-strength-to-knee-valgus link found only about a third of the studies it examined actually supported the relationship, and one found the opposite.
Where hip strength does relate to knee valgus, it typically explains a modest share of the variance, not the whole picture. That doesn’t make the chart useless. It makes it a reasoning tool, exactly what the sentence above already says, not a diagnosis.
Feet Turn Out or Arches Flatten
When the feet rotate outward from their starting position, the athlete is usually buying range they cannot get in a straight line. Turning the foot out reduces the demand on ankle dorsiflexion, so a restricted ankle is one of the most common drivers.
Check it rather than assuming. Run the heels-raised retest, and compare sides, since one restricted ankle is far more common than two identical ones. Arch flattening frequently travels with knee valgus, which is why the two findings should be assessed together rather than logged as separate problems.
Knees Move Inward (Valgus)
Knees tracking inside the line of the foot during the descent or the drive back up is one of the most reported findings in any movement screen. The usual suspects are hip abductor and external rotator control, adductor and tensor fasciae latae tension, and ankle range feeding the pattern from below.
Record left and right separately. A symmetrical inward track and a knee that collapses on one side only are different findings that lead to different programming and different conversations with the medical team. Confirm what you saw with a single-leg squat or a step-down, where a one-sided control issue is easier to see.
Excessive Forward Lean or Low Back Arching
Forward lean and low back arching are both trunk findings, but they point in different directions. Forward lean usually implicates calf and hip flexor tension against limited posterior chain and trunk contribution. Low back arching more often reflects hip flexor tension with the glutes and deep core not holding the pelvis in position.
Low back rounding near the bottom of the squat is a third, separate finding, and usually a hip or ankle range restriction rather than a trunk problem. Note which of the three you actually saw.
All of them can be hidden by letting the athlete squat shallower. This is the practical reason depth control matters: a screen that quietly reduces depth for the athletes who need it most will report improvement that never happened.
Arms Fall Forward
Arms drifting forward of the ears is often read as a shoulder finding, and sometimes it is. Just as often the limit is upper back extension. When the upper back cannot extend, the arms have nowhere to go, no matter how much shoulder range the athlete has.
Overhead and throwing athletes deserve a separate shoulder screen when this shows up, since it can travel with a restriction that has nothing to do with the squat pattern at all.
Does the Overhead Squat Assessment Predict Real Movement, or Just Itself?
A screen is only useful if what it finds shows up somewhere that matters. A handful of studies have looked at whether overhead squat compensations connect to how an athlete moves during running, jumping, and landing, not just during the squat itself.
An older conference study (Buckley et al., Journal of Athletic Training, 2007) found that knee and hip kinematics during a double-leg squat predicted knee and hip kinematics at initial contact of a jump-landing task, the same movement pattern associated with non-contact ACL injury risk.
More recently, a 2023 study measured overhead squat and treadmill running kinematics using a 9-camera Qualisys marker-based motion capture system in national-level distance runners, and found the overhead squat assessment reflected hip, knee, and ankle kinematics during running at 16 km/h.
The overhead squat also sits in the same family as the deep squat portion of the Functional Movement Screen (FMS), close enough that researchers have compared kinematics directly between the two.
| Feature | Overhead Squat Assessment | FMS Deep Squat |
|---|---|---|
| Scoring | Present/absent or a 3-point scale per checkpoint, protocol-dependent | Fixed 0-3 ordinal score, one part of a 7-test composite |
| Reps typically observed | Around 5 per viewing angle | Around 3 |
| Views | Front, side, rear | Front, side |
| Standalone or composite | Can be used alone or alongside other screens | Always one component of the full FMS battery |
If your organization already scores FMS, treat the two as measuring overlapping territory rather than something entirely separate, not a reason to run both without a clear purpose for each.
None of this makes the overhead squat assessment a standalone injury predictor. It’s one input, same as everywhere else in this guide. What it does mean is that a compensation caught here is worth taking seriously beyond the squat pattern itself.
Scoring and Documenting the Assessment
Two scoring approaches work in team settings:
- Present or absent per checkpoint. Fast, easy to teach, and enough for a first pass across a full roster.
- Three-point scale: no deviation, minor, marked. Slower, but it captures direction of change across a season.
Whichever you use, turn the checkpoints into one checklist and fill in the same fields every time:
- Date, athlete, and who ran the screen
- Depth cue used and footwear
- Front, side and rear findings, scored per side
- Heels-raised retest result
- Any modification used, such as a bodyweight squat instead of overhead
- Follow-up assessments triggered
A printed chart on a clipboard and a PDF form on a tablet both work. What matters is that the same fields get filled in by every staff member.
Baseline at the start of a training block, retest after a phase change, after heavy travel or congested fixtures, or when an athlete’s status changes. Store it somewhere the next staff member can find it. A screening record that lives in one coach’s notebook stops existing the day that coach leaves.
Where the Eye Test Runs Out
The overhead squat assessment is a good screen with a measurement problem.
Real-time visual scoring depends on where you stand, how experienced you are, and what you catch in roughly two seconds of movement, repeated across a roster of forty athletes on a Tuesday morning. Two staff members watching the same athlete can reasonably disagree. The same staff member can score the same athlete differently in week one and week ten, with no way to check which reading was right.
Visual scoring also produces categories rather than degrees. A knee valgus that genuinely improved from marked to minor still reads as “present” on most forms. Six weeks of targeted work can look like no change at all, which is a poor basis for deciding whether a programme is working.
Phone video solves the timing problem, since you can watch the rep again. It does not solve the measurement problem: staff are still estimating joint angles from a flat image, and the estimate changes with camera position.
To understand how systems overcome the limitations of a single camera, it helps to look at how 3D motion capture works and how multiple views are used to reconstruct movement.
For teams, the consequence is practical. It is hard to prove a programming change worked, and hard to support a return-to-play discussion when the objective record is a set of subjective notes.
From the Eye Test to Measured Angles
Camera-based movement analysis records the same squat pattern and reports actual joint angles and positions instead of a rater’s impression. If you’re comparing different approaches, our guide to choosing a markerless motion capture system breaks down the key factors to consider before investing in one.
OnTraq uses an eight-camera setup with no markers and no wearables. It builds a body model sized to the individual athlete, captures the movement and returns a readable report within minutes, covering joint angles, positions and how each result compares with that athlete’s own baseline.
Because the method is identical every session, a change in the number reflects the athlete rather than the operator, the camera angle or whoever happened to be running testing that day.
Speed is what makes it usable in a team environment. Testing runs about 90 seconds per athlete, so a full roster fits inside a warm-up rather than requiring a dedicated testing session nobody on the coaching staff wants to give up. Any staff member can operate it, which removes the specialist bottleneck that keeps most 3D motion capture systems out of weekly use.
The underlying measurement work is not new. OnTraq is built on Qualisys’ foundation of biomechanical accuracy, from a company that has been measuring human movement since the 1980s. What markerless motion capture adds is the ability to use that level of measurement often enough to matter, without marker placement, charging, syncing or compliance issues.
None of this replaces coaching or medical judgement. It gives staff a number they can reason from and defend.
Baselines: Turning a Screen Into a Tracking Tool
A single overhead squat assessment is a snapshot. Its value comes from comparison against the same athlete’s own baseline, not against a population norm or another athlete on the roster.
For teams new to the technology, understanding what markerless motion capture is and how it works can clarify how these measurements are collected without markers or wearables.
Set the baseline when athletes are healthy and rested, which for most organisations means pre-season, before load ramps up. Then track the same checkpoints through the block. Does the knee angle change under accumulated fatigue? After a travel-heavy stretch? Through a rehab progression? Trend views let staff notice drift early, while it is still a training adjustment rather than a conversation with the medical team.
That timing shapes how teams buy as well. Most teams install and train staff during the off-season so the system is ready when the baseline window opens in pre-season, and college programmes plan against their academic fiscal year. Deep in-season is the worst moment to introduce anything new.
On the practical side, the sport-specific movement library, the personalised trend dashboard, API export and force plate integration sit in the Silver subscription package. Everything is a monthly subscription covering hardware, software, cloud storage, installation and support, so there is no large upfront equipment purchase to justify.
Frequently asked questions
What does the overhead squat assess?
What does it mean if you observe the feet turning out?
What type of client assessment is a squat or overhead squat assessment?
How many repetitions, and how deep?
Is the overhead squat assessment consistent between different coaches?
Can it be used for return-to-play decisions?
What if an athlete cannot get their arms overhead?
Next Steps for Performance Staff
The overhead squat assessment is worth keeping. Run it with a consistent setup, a fixed depth cue, all three viewing angles, five reps per view, and a checklist filled in the same way every time. Score what repeats, note asymmetry explicitly, and always run the heels-raised retest.
The screen is only as good as the consistency of the person running it, which is the ceiling every performance department eventually hits.
If your staff want those same movement checkpoints measured rather than estimated, you can book a demo with the OnTraq team and see the report and trend view against real athlete data. Early adopters are currently getting Silver features at Bronze pricing, a framework in place until at least January 2027.